
“Whoever covers an offense seeks love, but he who repeats a matter separates close friends.”
Main Source: (1) Practical SQL: A Beginner’s Guide To StoryTelling With Data by Anthony Debarros (2nd Edition). (2) The PostgreSQL Documentation.
However, this post HAS variations to the above-mentioned text.
PURPOSE
The focus will be on Inserting Data into our “administration” table that was previously created in Post #3.
When we created the “administration” table, there was no data inserted into the table. Typically, tables are created in PostgreSQL without data.
Data is inserted into the table, one row at a time.
Additionally, a complete row must be inserted. This means our SQL command must include all the necessary columns that we created our table with.
“Whoever conceals an offense promotes love, but whoever gosspis about it separates friends.”

Here is the PostgreSQL code to copy & paste into your Query:
INSERT INTO administration (first_name, mid_int_name, last_name, school_name, date_of_hire, salary_current)
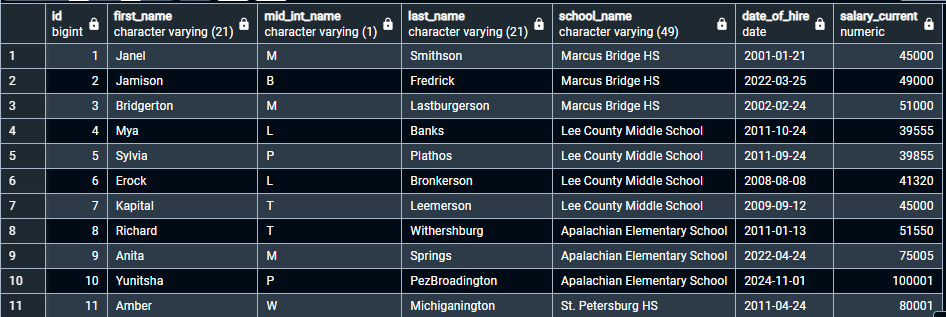
VALUES ('Janel', 'M', 'Smithson', 'Marcus Bridge HS', '2001-01-21', 45000),
('Jamison', 'B', 'Fredrick', 'Marcus Bridge HS', '2022-03-25', 49000),
('Bridgerton', 'M', 'Lastburgerson', 'Marcus Bridge HS', '2002-02-24', 51000),
('Mya', 'L', 'Banks', 'Lee County Middle School','2011-10-24', 39555),
('Sylvia', 'P', 'Plathos', 'Lee County Middle School', '2011-09-24', 39855),
('Erock', 'L', 'Bronkerson', 'Lee County Middle School', '2008-08-08', 41320),
('Kapital', 'T', 'Leemerson', 'Lee County Middle School', '2009-09-12', 45000),
('Richard', 'T', 'Withershburg', 'Apalachian Elementary School', '2011-01-13', 51550),
('Anita', 'M', 'Springs', 'Apalachian Elementary School', '2022-04-24', 75005),
('Yunitsha', 'P', 'PezBroadington', 'Apalachian Elementary School', '2024-11-01', 100001),
('Amber', 'W', 'Michiganington', 'St. Petersburg HS', '2011-04-24', 80001);
So, Let’s Break Down This Code Into Small Sections

(1) INSERT INTO
The INSERT INTO statement requires using the table name & column values.
TWO WAYS TO
ADD DATA
w/ INSERT INTO COMMAND
It is good practice to explicitly list the columns you are adding data into in your SQL command. However, it is also possible to implicitly refer to the columns as I will show in Method #2.
Method #1: Explicitly
After INSERT INTO & the table name, explicitly list the column names : (column_name_1, column_name_2, column_name_3).
Then after VALUES, list the data being added : (data_forcolumnname1, data_forcolumnname2, data_forcolumnname3).
INSERT INTO tablenamehere (column_name_1, column_name_2, column_name_3, etc. . .)

VALUES (data_forcolumnname1, data_forcolumnname2, data_forcolumnname3, etc. . .);
Our code would be written like this:

The column names of the “administration” table are: “first_name”, “mid_int_name”, “last_name”, “school_name”, “date_of_hire”, “salary_current”.
The data added is in yellow and green (‘Janel’, ‘M’, ‘Smithson’, ‘Marcus Bridge HS’, ‘2001-01-21’, 45000).
Method #2: Implicitly
The second method chooses to list the data being added–in the order–that the columns are listed in the table.
If the data is out-of-order, the command will produce an error.
Notice the column names are missing, this method is implicit.
INSERT INTO tablenamehere
VALUES (data_forcolumnname1, data_forcolumnname2, data_forcolumnname3, etc . . .);
Our code would be written like this:

(2) VALUES
VALUES is a keyword.
The VALUES keyword will typically be followed by data, which will be explored a bit further in (4) below.
According to documentation, “VALUES computes a row value or set of rows specified by value expressions.”
When two or more rows are specified, the rows must have the same number of elements.
*** Be careful about entering VALUE list with large numbers of rows. You may encounter memory failures & poor performance. However, VALUES appearing with INSERT, is treated as a special case since the desired column types are known from the target table (3).
(3) administration
This is the target table for the INSERT command. It lets the DBMS know which table in our database we would like to work with.
In this case, we are working with the administration table.
(4) (first_name, mid_int_name, . . .)
These are the names of the columns, from the table administration, that we will be INSERTING — VALUES into.
As mentioned in (1), these columns can be explicit or implicit in the SQL command
BUT . . .
the data entered after VALUES must be of the correct data type & in the correct order for the columns.
(5) ” , ”
Since we are adding multiple rows of data into our administration table, remember to add the comma into the SQL statement.
(6) “;” – semicolon
Don’t forget to end your SQL statement with a semicolon.
(7) 80001 vs ‘2011-04-24’
Some data types like the string ‘2011-04-24’ require a single quotation around them ‘ ‘; these are typically characters & strings.
Other data types like numericals, 80001, typically do not require a single quotation around them.
So, now let’s enter the code into the system! Make sure to add the semicolon at the end !!

If successful, your output should look similar to this:
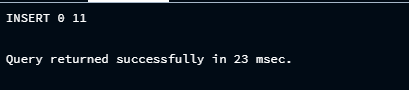
You may get a different query return rate. Mine is 23 msec, but this can vary for a variety of factors.
The ‘0’ is an unused legacy PostgreSQL value which helps maintain wire protocol.
The ’11’ reports the number of rows inserted into the table.
Viewing Our Results
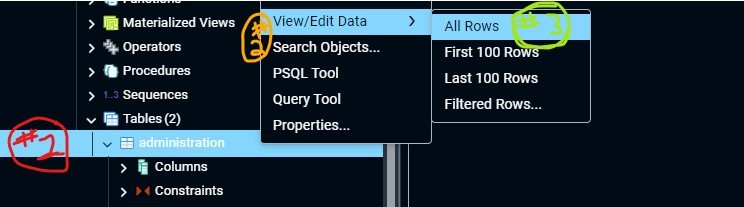
Step #1: In the object explorer, right-click on the administration table.
Step #2: Next, after right-clicking, choose “View/Edit Data”.
Step #3: Select “All Rows”.
The next post, Post #6, will focus on the basics of SELECT.
“One who conceals an offense seeks love, But one who repeats a matter separates close friends.”
Leave a Reply